Fretboard Archives - Daniel Gaviria (Guitarist and instructor)
In part 1 of this series, we looked at the very basic concept of how to name the notes and how to utilize the layout of the piano keyboard to figure out flats and sharps. In part 2 we will be focusing on learning how to name the notes on the fretboard of the guitar. Welcome back. I hope you enjoy this article.
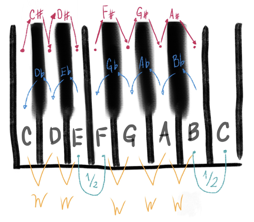
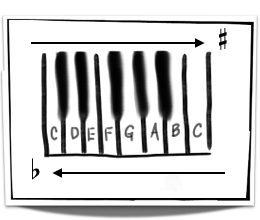
In part 1, by following the pattern of going up by 1/2 steps (minor seconds), to name the sharp keys , and down to name the flat keys, we ended with something looking like this:
Piano keyboard layout with all the note names
We learned that the black keys of the piano can either be called sharps or flats. Deciding which kind of name to use depends on the scale or chord that is being used. We will talk more about this later in another article but for now, let’s jump right in to fretboards.
The Guitar
First things first:
Most guitars have 6 strings. There are guitars with 7 or 8 strings which extends the lower register of the instrument. In this article we will focus on learning the notes on guitars with 6 strings.
Most guitars will have 19 frets (the rectangles on the fretboard) and some will have either 22 or 24 frets. Having more frets gives the guitarist the ability to play higher notes, thus extending the upper range of the guitar.
Tuning:
There are several ways you can tune the strings of the guitar. Each tuning gives the guitar a different sound and different capabilities, depending on the sound or the style you are interested in. Most people will use the so called Standard Tuning and that is the tuning we will be using in this article.
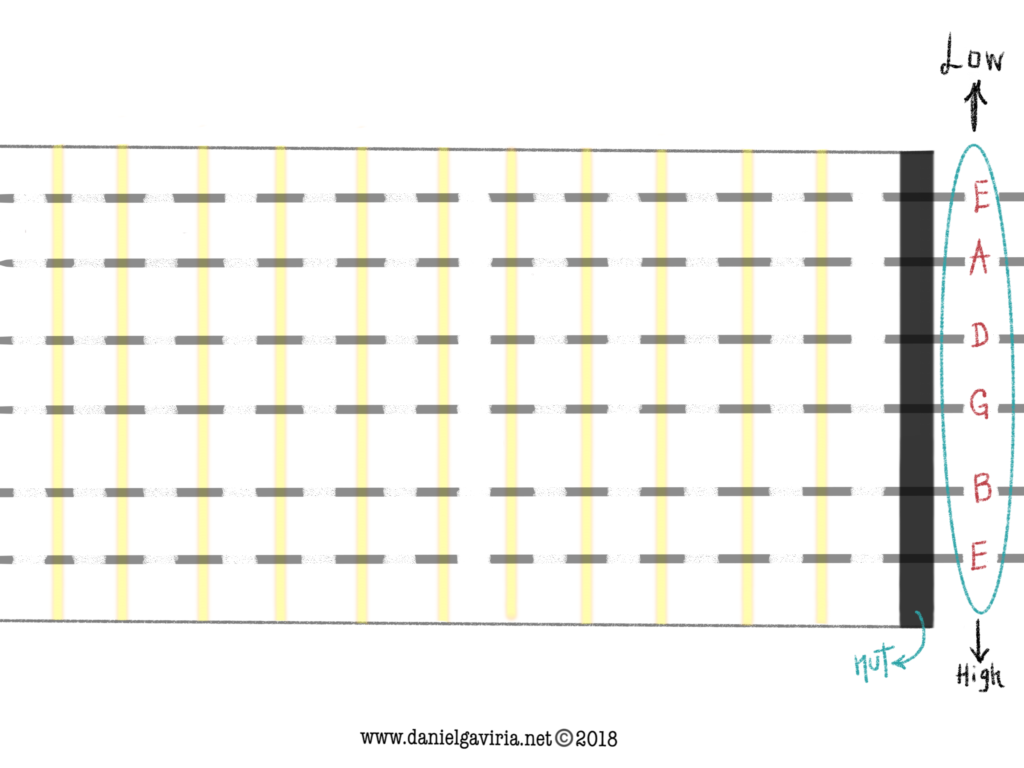
Fig 2: 1st string High E, 2nd string B, 3rd string G, 4th string D, 5th string A and 6th string low E
It is important to note that Standard Tuning is the tuning you get when you play the strings without placing any fingers on the fretboard. It is also very important to memorize the note name of each string in this tuning (or any tuning) in order to figure out the note name of each fret.
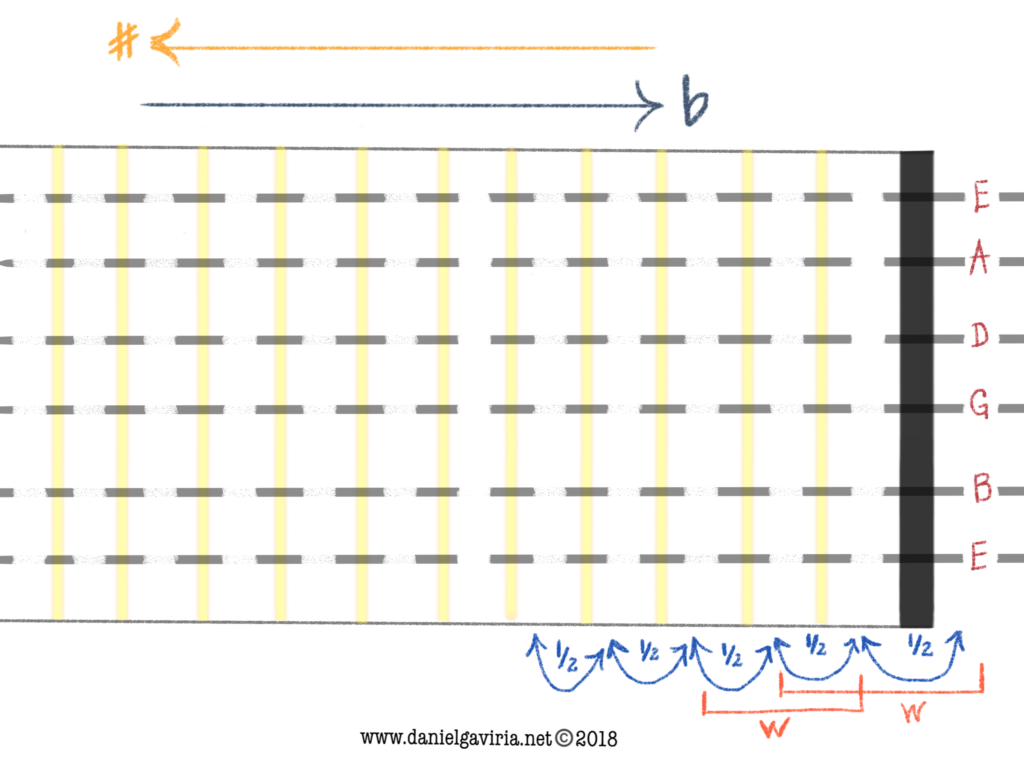
The way we name the notes on the fretboard is basically the same way we name the notes on the piano. On the guitar, every fret going up or down is also 1/2 step (minor second). This also means that we get a whole step (major second) every 2 frets, no matter where you start. Again, when going up from low to high we will use sharps. We will use flats going the opposite way, from high to low.
Fig 3: 1/2 stands for minor second or half step. W stands for whole step.
In Part 1 of the series, we started on the note C because that is the note the keyboard pattern of the piano starts on. On the guitar it works a little differently. We will start naming the notes depending on the tuning. In Standard Tuning, the first string played open (no fingers on the fretboard) is an E.We have to start counting our minor seconds from that note.
Finding the notes on the Guitar
Sharps
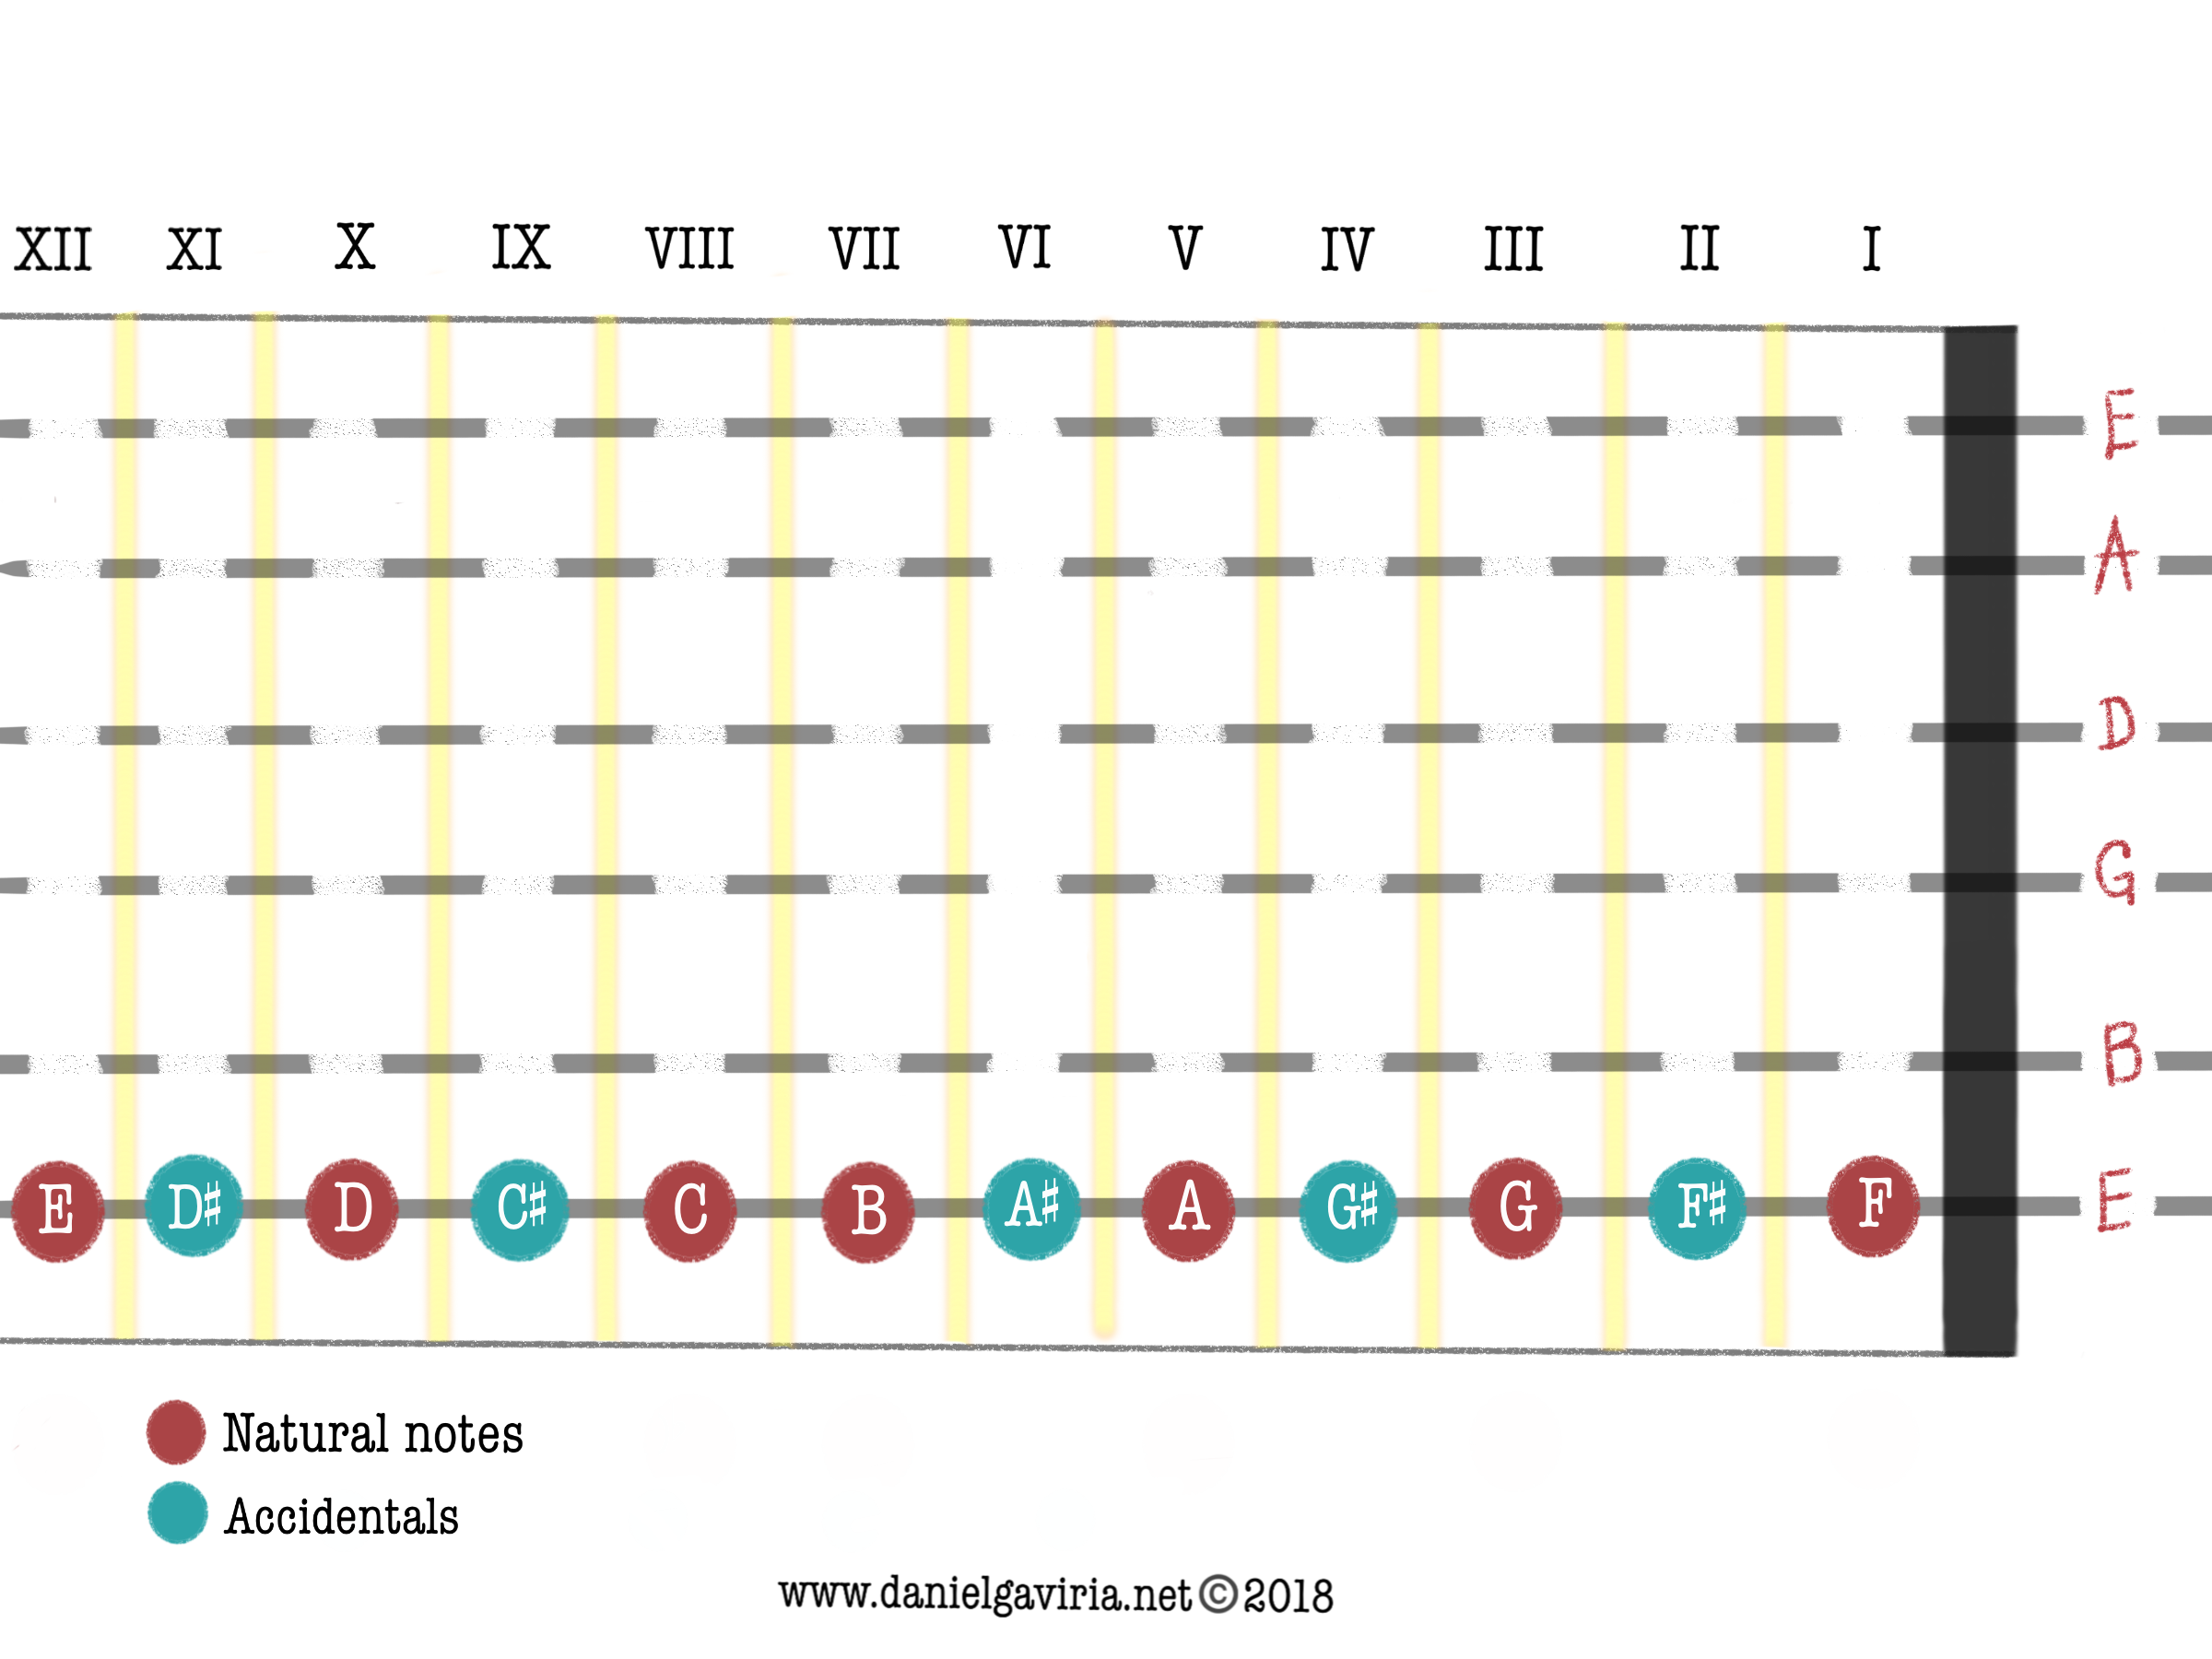
Let’s begin at our 1st open string, the high E. To figure out which note is played when we put a finger on the first fret, let’s look at our note calculator (see fig 1).
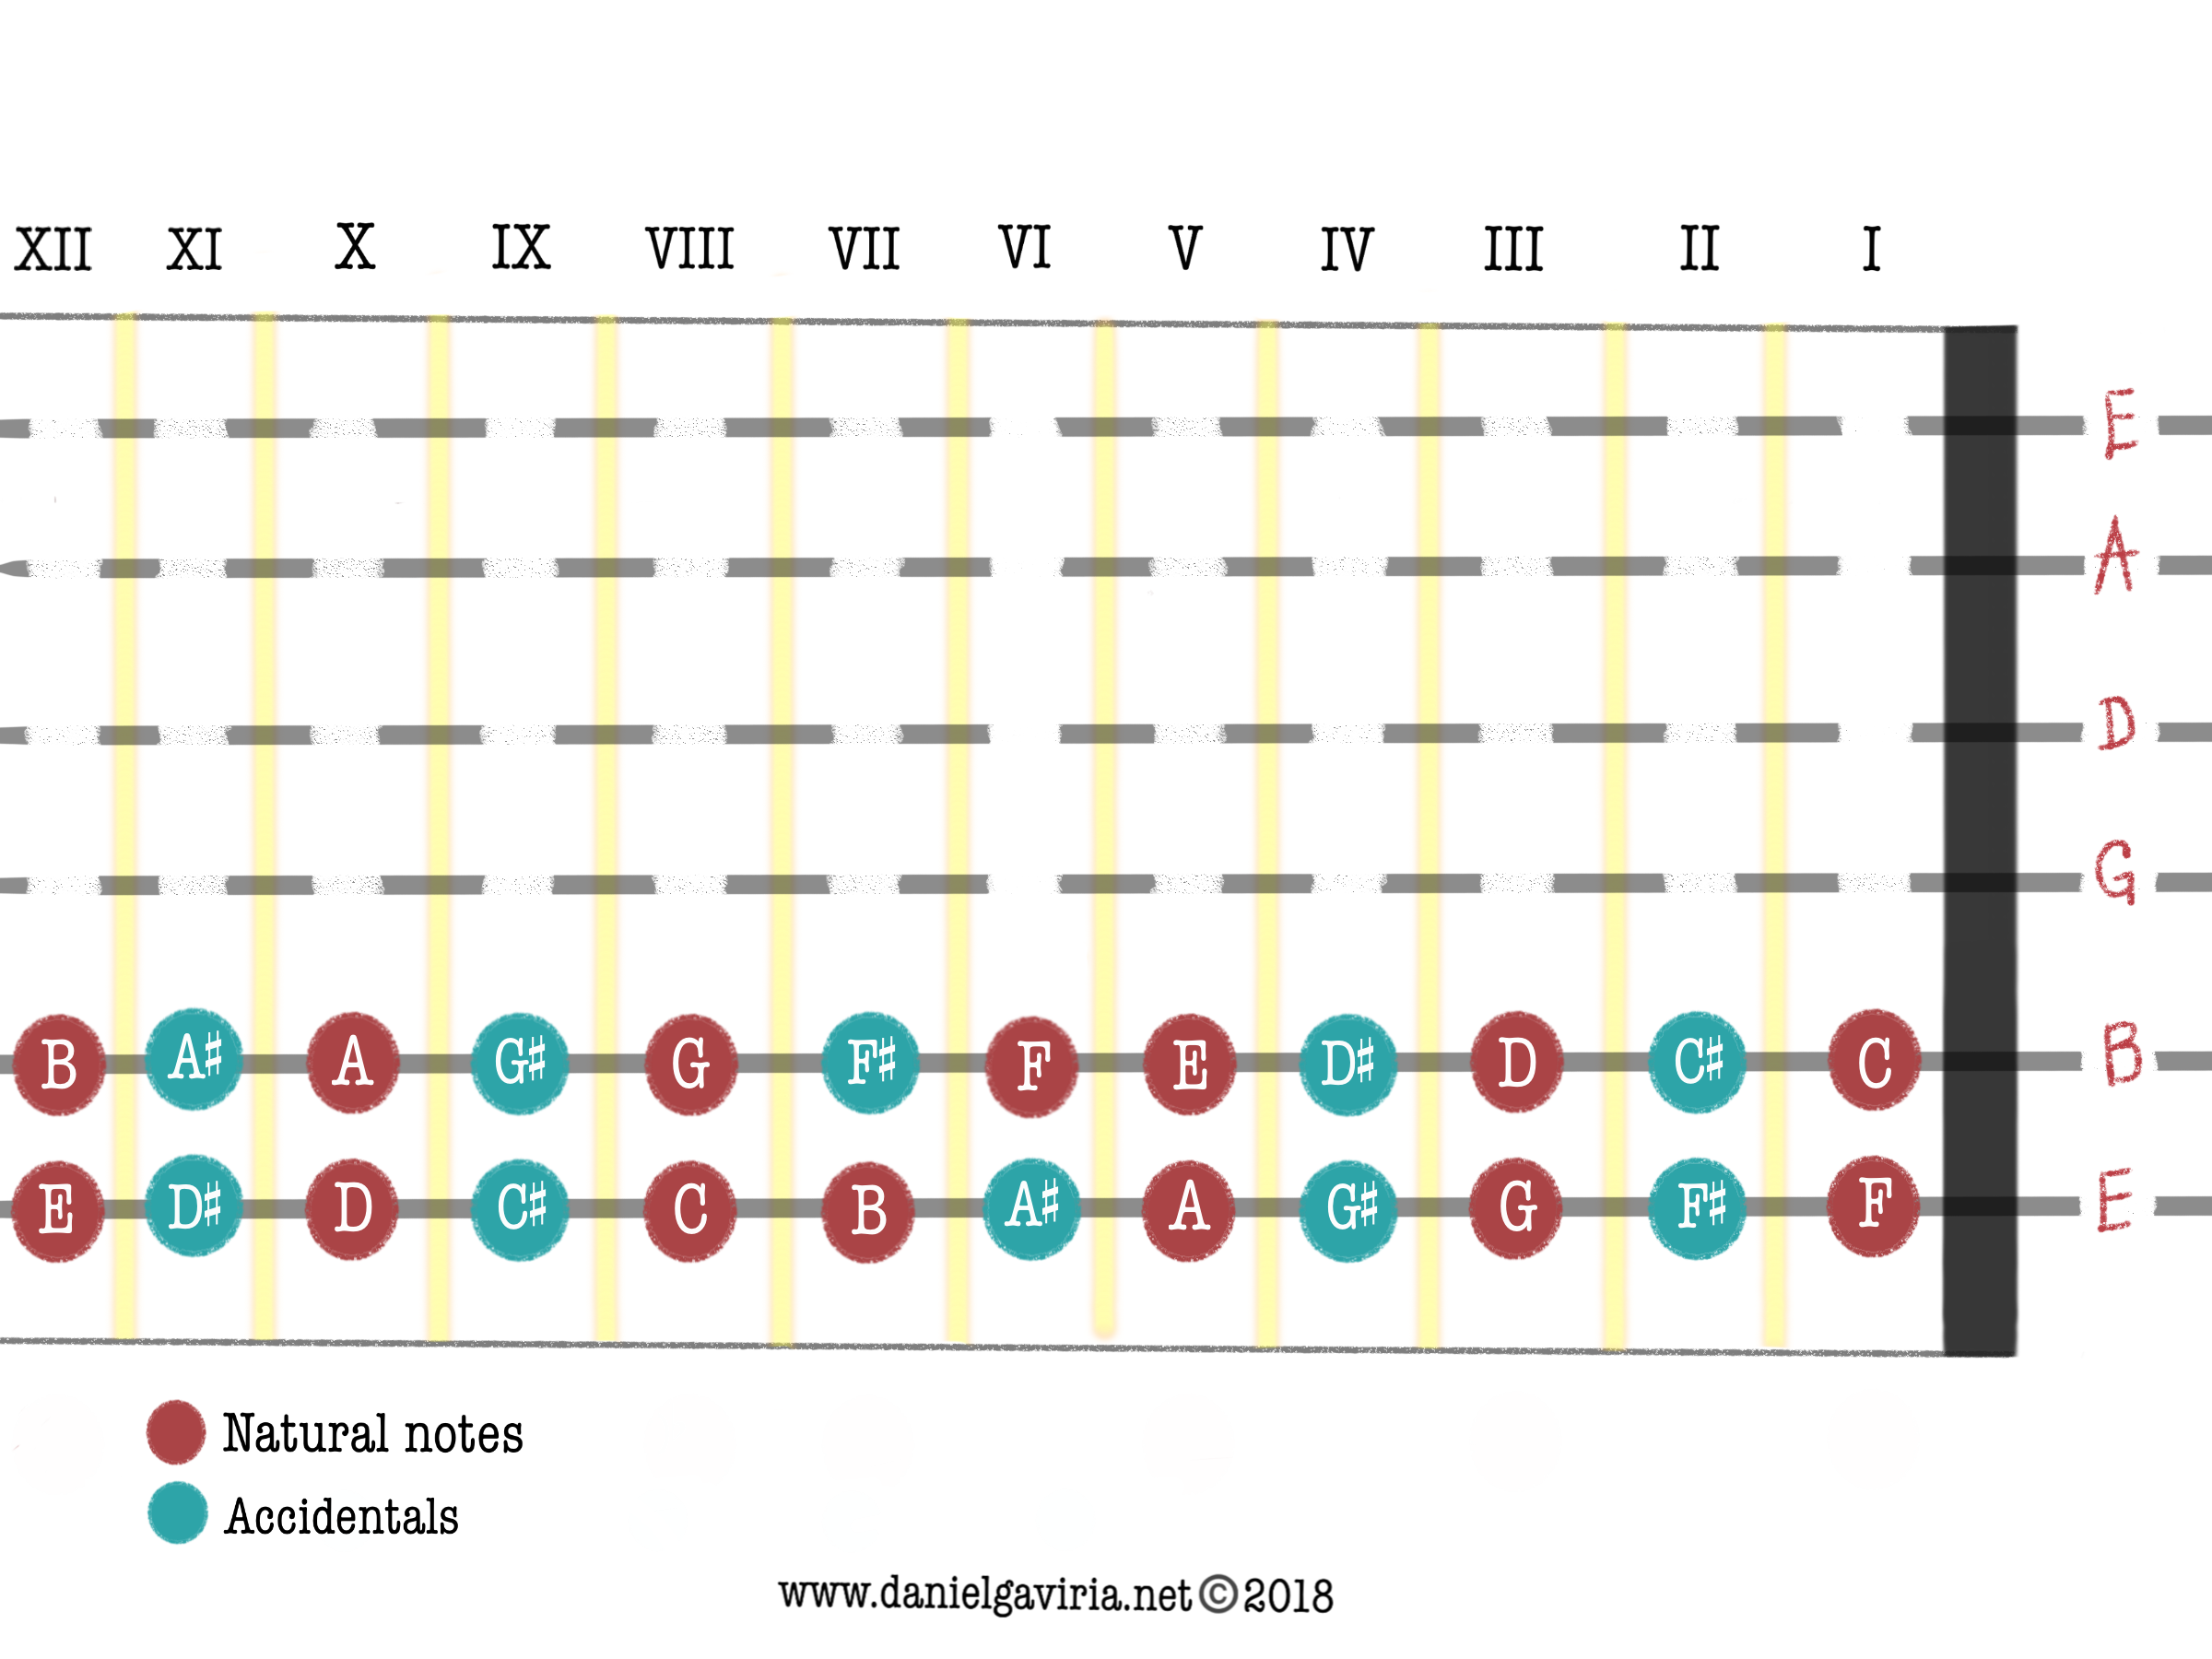
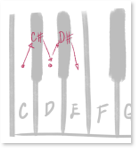
On the guitar when we play an open string followed by putting a finger on the first fret of the same string, we will always go a 1/2 step up. Therefore, on the high E string, when we press down on the first fret we will get an F, because there is a minor second between E and F (see fig 4).
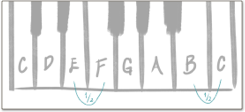
Now we are on F (1st fret). From there on, what we need to do is to just go up by 1/2 steps (minor seconds) or fret by fret, looking at our note calculator (fig 1). Since we are going up, all the accidentals we play will be called sharps. If we move our finger a minor second up to the 2nd fret, the note we get is F# (F Sharp). On the 3rd fret we get a G, on the 4th fret we get a G#, on the 5ft fret an A, on the 6th fret an A#, and on the 7th fret a B. Our note calculator (fig 1) tells us that there is a 1/2 step between B and C. This means that on the guitar, the 8th fret is C. The 9th fret will be then C#, the 10th fret D, the 11th fret D# and the 12th fret E.
On the 12th fret we will always use the same note name as when we played the same string open (no fingers), just higher, and by that I mean an “octave” higher. An octave is the distance between two notes that are twelve half steps (12 minor seconds) apart either up or down.
Fig. 4 Natural notes and sharps on the high E string. The roman numerals are used to identify the number of the frets.
To identify the notes on the 2nd string (B string) we will use the same method we used to name the notes on the E string. This time we start on the note B because that is the name of the 2nd string. Sorry if I am being repetitive I really want you to get this!
Look at the note calculator (fig 1). After B, comes C, which means that the first fret on the B string will be C. The 2nd fret will be C#, the 3rd fret D, the 4th fret D#, the 5th E, the 6th fret F, the 7th fret F#, the 8th fret G, the 9th fret G#, the 10th fret A, the 11th fret A# and finally our 12th fret B, making an octave (Fig 4.1).
Fig 4.1 Natural notes and sharps on the B string (2nd string)
The way we identify the notes on the other strings will be the same way we identified the notes on the E string (1st string) and the B string (2nd string). You just have to be aware of the name of the string when you play it “open” and start naming the notes of each fret using the note calculator. Try it yourself, you can check your “answers” later with the picture at the end of the article (fig 5).
Flats
Keep the note calculator at hand (fig. 1). To identify the Flats we need to go the opposite way (high to low), so we will start at the 12th fret on each string. I must remind you that on the guitar, a fret that can be a sharp note can also be a flat note. Sharp and the Flats share the same fret just like on the piano, where they share the same black key. The Guitar is an instrument that use EQUAL TEMPERAMENT (see Appendix on Part 1).
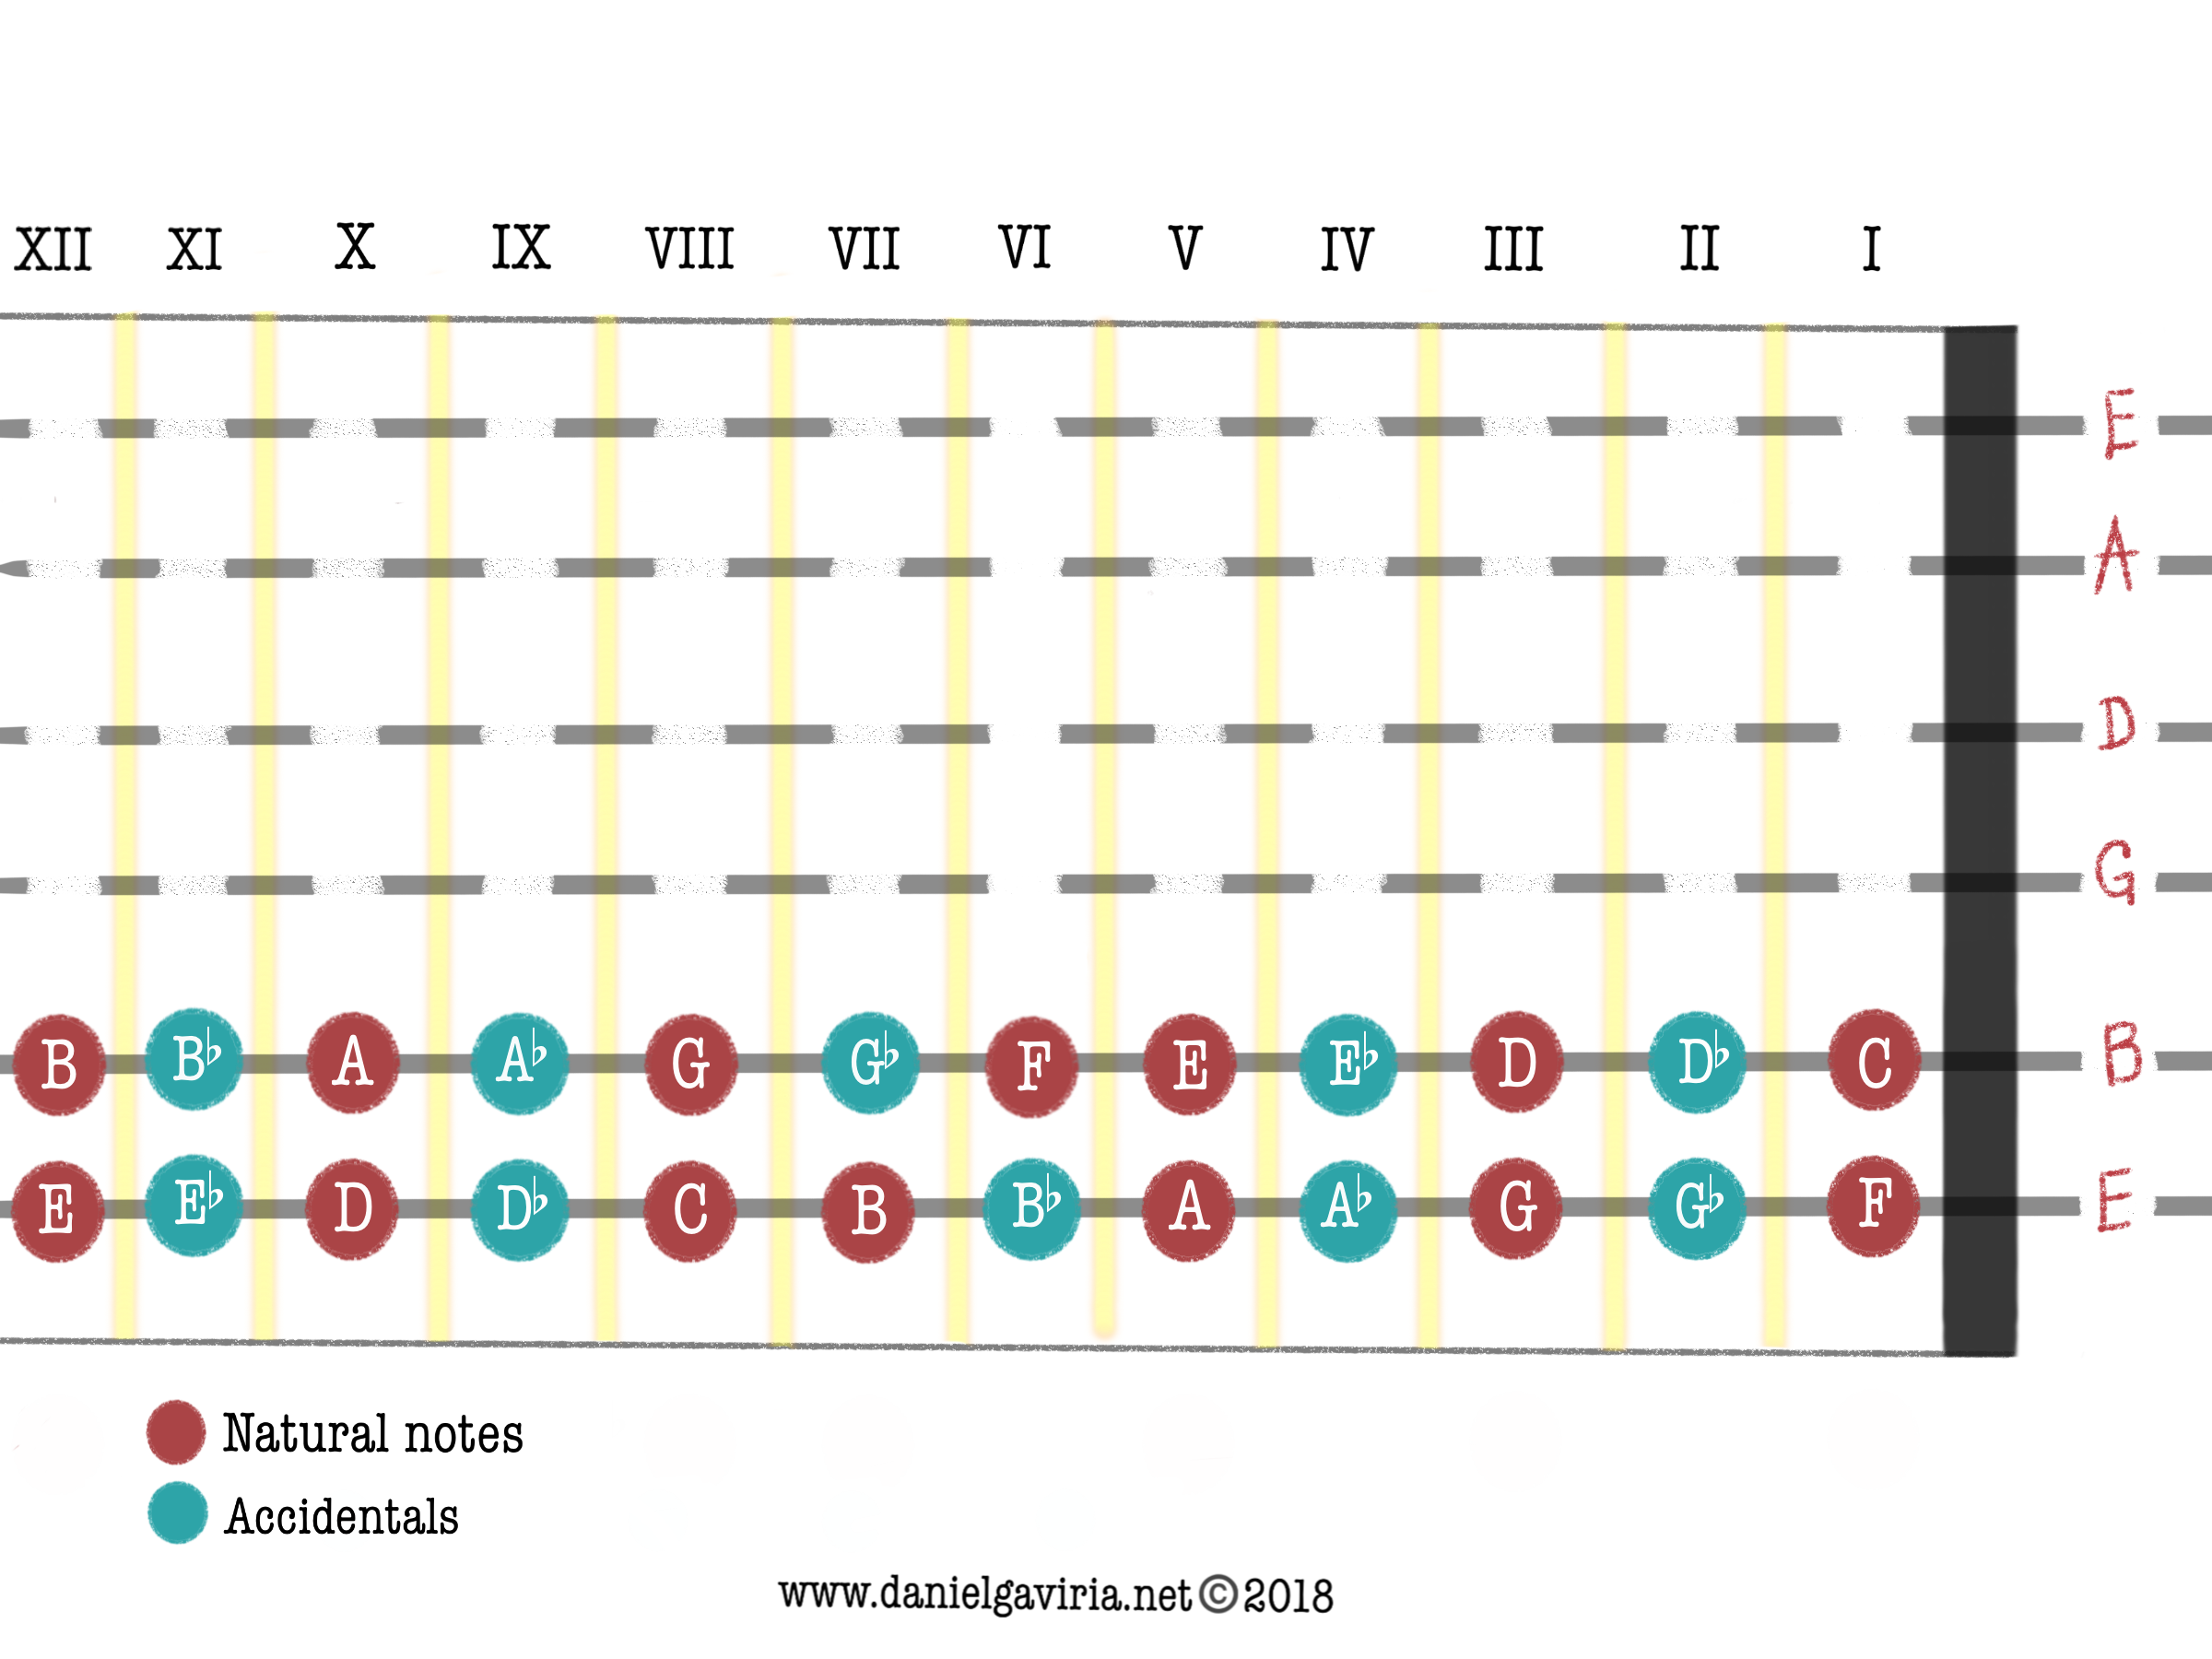
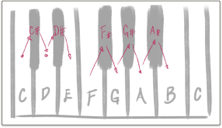
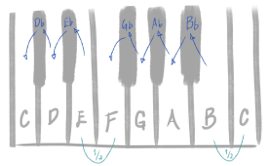
Take a look at figure 4.2. We already know that at the 12th fret on the E string we have an E. One fret down from the 12th fret (minor second or 1/2 step down) will take us to the 11th fret where we are going to find the note Eb. This means both Eb and D# are located on the 11th fret. Let’s keep going down, just naming the Flats. The 10th fret will always be D, the 9th fret Db (remember, we are going down), the 8th fret C, the 7th fret B, the 6th fret Bb, the 5th fret A, the 4th fret Ab, the 3rd fret G, the 2nd fret Gb and the 1st fret F. As you can see, the natural notes remain natural.
On the B string (second string) we will do just as we did on the 1st string, starting on the 12th fret named B. The 11th fret will then be Bb, the 10th fret will always be A, the 9th fret Ab, the 8th fret G, the 7th fret Gb, the 6th fret F, the 5th fret E, the 4th fret Eb, the 3rd fret D, the 2nd fret Db and the 1st fret C. And as we found on the 1st string, the natural notes remain natural and the Flats and the Sharps share the same fret.
Fig 4.2 Natural notes and flats on the high E string and on the B string
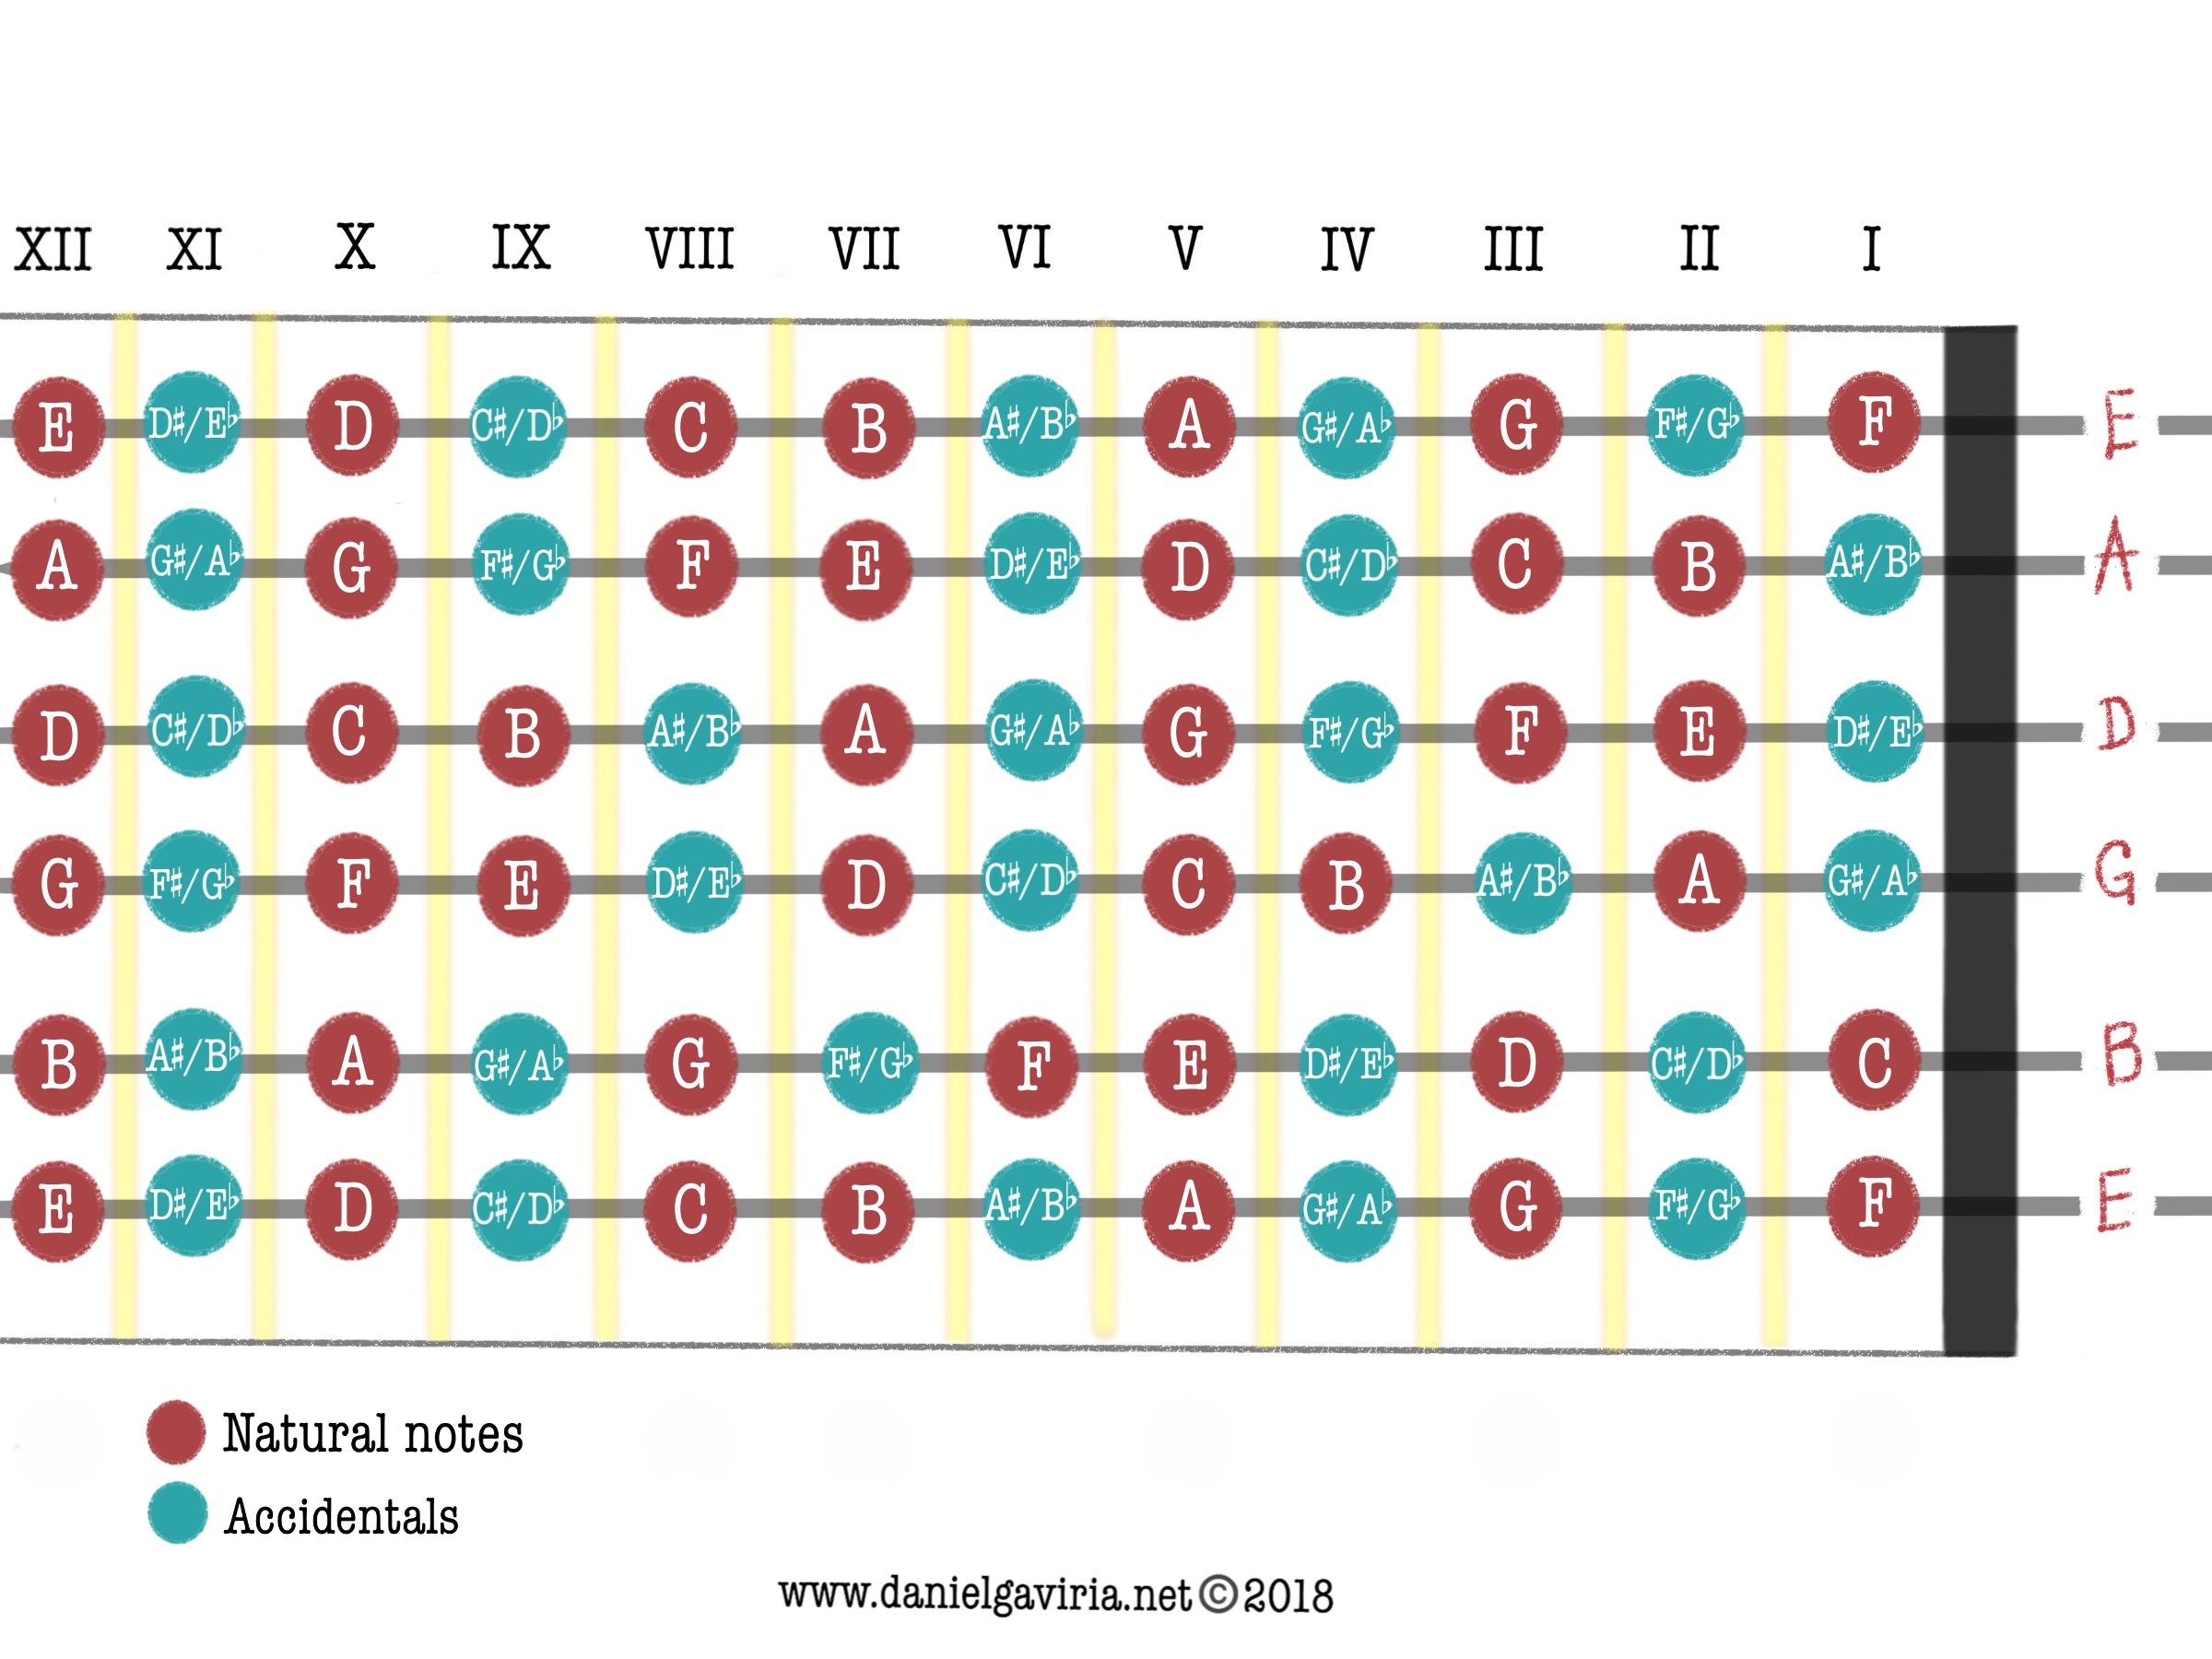
With the remaining strings (G, D, A and low E), just follow the same procedure we followed to identify the flats on the E and B strings. Take this opportunity to name the notes on the other strings by yourself and compare your “answers” with the picture below (fig 5).
Fig 5: Guitar fretboard with all the note names
How did you do? Feel free to write me a message here, and let me know!
Now you may ask, what about the upper frets? The 13th, the 14th, etc…? If you keep going fret by fret by 1/2 steps, you will find that those upper frets will have the same exact names you identified on the first frets of each string. That is because you are, after the twelfth fret, one octave above. So at the 13th fret you will get a higher F than the F on the 1st fret of the E string. Remember, and octave is exactly twelve half steps up, just count the frets!
We are done!
On the guitar, this is basically the way we figure out all of the notes on the fretboard. The very good news is that this approach is also applicable to the Banjo (and it’s variations), the Mandolin (and all it’s variations), the Ukulele and any instrument in the world that has frets.You can even find the notes on the Violin, the Viola, the Cello and the Upright Bass using this approach (I have done it), although you have to have a very good ear to get the right pitch for the notes since these instruments don’t have frets. The names will change in some instruments that use different tuning, but essentially, they follow the same idea.
In the next article I will give you some ideas on how to memorize the notes on each fret. I will also show the notes on the guitar using other types of tunings, so stay “tuned”.
See you next time!
How many of you struggle with figuring out the notes you are actually playing? You found an arrangement of that song you were longing to play but… it is on standard notation, you kind of know how it works but you don’t have a clue how to translate what you see on the paper to the guitar. Maybe you are that kind of player tired of reading tablature and wants to bring your knowledge of the instrument to the next level. You watch all these people on videos saying “yeah, this is the G major 7th arpeggio” and you are sitting there watching them seamlessly playing that arpeggio up and down the fretboard while you are asking yourself “how?”. If you fall in any or all of these categories you might want to read this article.
At the early stages of learning, many of us learned scales and chords by looking at tablature, at diagrams or, with the advent of video streaming sites, by watching somebody telling you what to do. That is not obviously a bad thing, on the contrary, it is a very simple yet effective way to start learning to play the guitar and understanding how it works, but when you start diving into more complex chords, modes or simply trying to figure out music theory concepts on the guitar, keeping that approach (using tablature, diagrams, videos, etc.) might not work the way it used to.
I have come to realize that one of the most important (and undervalued) skill for us guitarists, aside from having a decently trained ear, is knowing the notes on the fretboard. Why do I consider that to be the most important? Because learning the notes on the fretboard not only allows you to know the notes, it unlocks the ability to create customized scale shapes that fit your fingers (or to challenge them), allows you to come up with great sounding chords shapes and, if you are starting to improvise, allows you to play fluently… You will free yourself up from constantly thinking in shapes, you will focus more on the lines you play, you will be able to create your own riffs and licks knowing what you are doing, and you will focus more on the music. When you master the ability of knowing the notes on the fretboard you will feel like a machine that only sees note names (and/or colors or tones for the prodigies) instead of just abstract and boring rectangles on a long piece of wood.
The Basics
Before we jump right onto the guitar, we need to first understand how naming the notes works. It is easy, just be patient. In music the most common intervals used to describe how close or far apart 2 different notes or pitches are, are the 1/2 step (minor second in theory books) and the whole step (major second). A whole step or major second is the sum of two 1/2 steps. We have 3 accidentals that are used to describe a 1/2 step down, a natural and a 1/2 step up:
Flat
Natural
Sharp
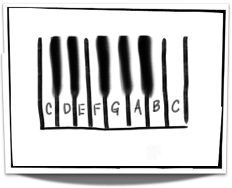
The FLAT lowers down a natural note by a 1/2 step, the NATURAL is just a natural note (the white keys on the piano) and the SHARP raises the pitch of a natural note by a 1/2 step. Now that I mentioned the piano, let’s use its layout to better explain myself. The layout of the piano keys is for me the most clearest way to understand how you figure out note names. I call it the note calculator.
Almost everyone knows the name of these notes:
C D E F G A B C
On the piano they look like this:
The scale above is the famous C major scale. The two C’s you see on the drawing above are the same notes, they are just what in music is called an octave apart. The far right C is an octave higher than the far left C.
Finding the accidentals
We now know that the layout of piano keys is a pattern of 12 keys repeated throughout the instrument. We have 7 white keys with different names (C, D, E, F, G, A, B) and we have 5 black keys. Now you may ask, what are those black keys for? Those black keys are the ones where the FLATs and the SHARPs are located meaning, both accidentals (flat and sharp) are located on the same key (more about this later), it all depends the direction you are going. If you are going from low to high (left to right) SHARPs are the accidentals we will use to name the black keys. If we go the opposite way (high to low) we will use FLATs. That is an important concept related to how notes are named.
It is important to note that on the piano the 1/2 step is the interval you get when you play key after key without skipping any. To name the black keys, let’s go from low to high first. We will start from the C on the far left and then we will go to the next immediate key which is our first black key (our first 1/2 step up). To name that black key we have to use the same name of the key we started on, in this case, C, and since we are going from left to right and we already know the accidental we use when we go in this direction is the SHARP, we will just need to add it to the note name, getting a C# (you read C SHARP). This means that from C to C# there is a 1/2 step or a minor second. Remember, every 1/2 step up or down is called a minor second.
Now we jump a 1/2 step up from that C# onto our next immediate key which is D. Next, we jump a minor second up from D to the following black key. Following the previous pattern, that black key will have the name of D#. From D# we jump another 1/2 step up (minor second) from D# to the next key E. Our calculator will now start looking something like this:
Now you ask, “what about E and F?… there is no black key…” Good question. If you look carefully, there are 2 places on the keyboard where you don’t have a black key in the middle, between E-F and B-C. Because there isn’t a black key that means that between E and F there is a 1/2 step (minor second). The same applies between B and C.
But, Couldn’t I name the key F as E# or B# instead of C if I follow the pattern? That is also a great question and the answer is, you can, it all depends in the context that E# or B# is. Heck, there are also DOUBLE FLATS and DOUBLE SHARPS! Let’s keep this simple for now, we will dive into all of that later
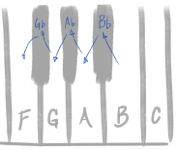
So for now, the key E stays E and the key F stays as F. If we keep following the procedure we have been using, the remaining 3 black keys, will be an F# between F and G, a G# between G and A and an A# between A and B:
Great, now lets find the FLATS
Finding the FLATS works the same way we used to find the SHARPS. The only difference is that we are going to start from the C at the far right and we will go down using 1/2 steps (minor seconds).
We already know that between B and C (or C and B this time) there is a minor second. We are on B now, and if we go down another minor second, we arrive onto the first black key going from right to left (or high to low). We will use the same name that preceded that black key (this time B) and we will add the FLAT to it, getting Bb (read B Flat). From that key we go down another minor second arriving at A. Next, another minor second down to our second black key this time with the name of A, we add the FLAT to it and we get, Ab. Another minor second down, and we arrive at G. Then we go 1/2 step down, to the third black key, use the name that preceded that key (G), add the FLAT, and you get Gb. Another minor second down and you will get to F.
F and E stays the same. If you keep going by 1/2 steps from E you will get all the FLATS:
If you were to draw our note calculator with every single element that we have talked about so far, the drawing would look like this:
The W stands for whole note (major second) which is a sum of two 1/2 steps (two minor seconds). There is a whole tone from C to D, from D to E, from F to G, from G to A and from A to B
You will notice that the black keys can have 2 different names, they could either be a SHARP or a FLAT. Deciding which name to use depends on the scale or chord they will be used in. A scale (either major or minor) or a chord, are concepts we will be learning later to better understand music theory.
This bring me to mention that having two different “pitches” or notes on the same key or fret is called ENHARMONIC SPELLING. In EQUAL TEMPERAMENT (see appendix) both C# and Db are the same pitch, black key or fret, there are almost no distinguishable acoustical differences between them, they are ENHARMONIC. The same applies to the other chromatic notes: D#/Eb, F#/Gb etc, just like the drawing above.
Congrats, you just figured out all the FLATS and SHARPS used in music to figure out scales, arpeggios, chords, minor and major keys etc. What is best, you just figured out what in music is called a CHROMATIC SCALE. A chromatic scale is a group of notes played sequentially by using only 1/2 steps (minor seconds). If you play from C to C using minor seconds you will get a chromatic scale. You could call it a C chromatic scale but in music we don’t tend to give an specific name to CHROMATIC SCALES. Chromatic notes are a very important part of music because using they can add more color to a melody or a chord. Think of the CHROMATIC SCALE as having an art palette with acrylic paint of different colors on it, ready to be used. It may not produce something desirable in you when you look at it but you know that if you or somebody use those paints to paint a landscape, you would end up with something far more interesting to look at because the colors were combined and carefully chosen to create other color tones or to create and embellish the sky or the grass.
Appendix
For those interested on the scientific side of music, the phenomenon of having two different note names on the “same pitch” came from an attempt to divide an octave into 12 equally separated pitches many years ago, the reason why the piano has 12 keys each with a different name. This was called EQUAL TEMPERAMENT a type of tuning that basically minimized the real acoustical differences between a natural note, a Flat and a Sharp. There are a few other types of tunings each with different characteristics and uses. You see, in reality and according to science, Flats and Sharps are not the same note, a Flat is slightly lower in pitch than a Sharp. This is something a person with perfect pitch can distinguish. We will probably be able to do so as well but we would need to be born again and be trained by musicians from the cradle in order to actually learn how a flat and a sharp sounds. No wonder why Middle Eastern or Indian music sounds so different and unique to our ears, they can hear many of those minimal differences and use them too.
If people were to build instruments that would actually produce each note at true pitch, these instruments would end up being almost unplayable and totally unpractical, like trying to build a guitar with a different fret for a flat, a sharp and a natural note. That is one of the reasons people decided to use EQUAL TEMPERAMENT once it was understood and developed, to shorten the acoustic differences between pitches and able to build more practical instruments like the piano, the organ, the guitar etc. More about this at https://en.wikipedia.org/wiki/Equal_temperament
Getting familiar with how naming the notes works is a very important step in learning the note names on the guitar or any other fretboard instrument. In part 2 of this article, I will be applying everything you read here, to find all the notes on the fretboard, so please, be sure to review very well what this first part offered to you before moving on. One thing you should be aware of is that what you learned here applies to all instruments. Knowing how to name FLATS and SHARPS using 1/2 steps (minor seconds), is the very core concept of how music works. There is much to it but it is very important to understand it if you want to know more complex concepts.